Showing posts with label Linux. Show all posts
Showing posts with label Linux. Show all posts
Saturday, February 23, 2019

Thursday, February 08, 2018
Build stress-ng for ARM
From the README file, some packages are needed to build stress-ng:
* libaio-dev
* libapparmor-dev
* libattr1-dev
* libbsd-dev
* libcap-dev
* libgcrypt11-dev
* libkeyutils-dev
* libsctp-dev
* zlib1g-dev
Since I am building stress-ng for testing in-house SoC, not all features are necessary to be enabled to test. Here is the steps I built.
1. Grab sources tarballs from https://packages.debian.org/sid/libaio-dev
These two tarballs are needed:
libaio_0.3.110.orig.tar.gz
libaio_0.3.110-5.debian.tar.xz
$ tar axf libaio_0.3.110.orig.tar.gz
$ tar axf libaio_0.3.110-5.debian.tar.xz
$ cd libaio-0.3.110/
$ for i in `cat ../debian/patches/series`; do patch -p1 < ../debian/patches/${i}; done
$ CC=arm-linux-gnueabihf-gcc CFLAGS=-mcpu=cortex-a9 make prefix=${HOME}/toolchain/arm-sysroot install
If the build failed because of some re-definition of __NR_io_setup, ... etc., modify
libaio-0.3.110/src/syscall-arm.h
to be
#ifndef __NR_io_setup
#define __NR_io_setup (__NR_SYSCALL_BASE+243)
#endif
#ifndef __NR_io_destroy
#define __NR_io_destroy (__NR_SYSCALL_BASE+244)
#endif
#ifndef __NR_io_getevents
#define __NR_io_getevents (__NR_SYSCALL_BASE+245)
#endif
#ifndef __NR_io_submit
#define __NR_io_submit (__NR_SYSCALL_BASE+246)
#endif
#ifndef __NR_io_cancel
#define __NR_io_cancel (__NR_SYSCALL_BASE+247)
#endif
2. Grab source tarball from https://packages.debian.org/sid/zlib1g-dev
$ tar axf zlib_1.2.8.dfsg.orig.tar.gz
$ cd zlib-1.2.8/
$ CC=arm-linux-gnueabihf-gcc CFLAGS="-mcpu=cortex-a9 -O3" ./configure --prefix=${HOME}/toolchain/arm-sysroot
$ make install
3. Build stress-ng
$ tar axf stress-ng-0.09.15.tar.xz
$ cd stress-ng-0.09.15/
$ CC=arm-linux-gnueabihf-gcc \
> CFLAGS="-pthread -mcpu=cortex-a9 -I${HOME}/toolchain/arm-sysroot/include -L${HOME}/toolchain/arm-sysroot/lib" \
> STATIC=1 make ARCH=arm
Copy the generated stress-ng to the board and run
# ./stress-ng --metrics-brief --verbose --timeout 5m --all 1
Friday, January 19, 2018
Change the thresholds of battery charging
In Ubuntu, it is possible to control when to start and stop battery charging based on capacity levels.
sudo apt-get install tp-smapi-dkms
sudo modprobe tp_smapi

if [ -e /sys/devices/platform/smapi ]
then
    cd /sys/devices/platform/smapi/
    for i in BAT?
    do
        cd $i
        echo 40 | sudo tee start_charge_thresh
        echo 80 | sudo tee stop_charge_thresh
        cd ..
    done
fi
Wednesday, March 15, 2017
Ubuntu 16.04 安裝 Rime 輸入法
1. Enable support for Chinese
- Launch "System Settings"
- Click "Install / Remove Languages..."
- Add "Chinese (traditional)"
- Log out and log in again
- Install rime by "sudo apt-get install fcitx-rime"
- Launch "System Settings"
- Select "fcitx" for Keyboard input method system
- Log out and log in again
2. Select rime
- Click the keyboard selection icon on the top-right corner of the screen
- Select "Text Entry Settings..."
- Click the "+" button on the left-down corner to add an input source to use
- Search for "rime" and add it
Wednesday, November 09, 2016
File system random write test
wtest()
{
val=$(( ($RANDOM % 10000 ) + 1 ))
name=$val
echo $name
while [ $val != 0 ]
do
echo $val >> $name
val=$(( $val - 1 ))
done
rm $name
}
{
val=$(( ($RANDOM % 10000 ) + 1 ))
name=$val
echo $name
while [ $val != 0 ]
do
echo $val >> $name
val=$(( $val - 1 ))
done
rm $name
}
md5sum files in directories and check
job()
{
while true
do
find bin/ etc/ lib/ sbin/ selinux/ system/ usr/ -type f -exec md5sum \{\} \; > $name
cal=`md5sum $name | awk -e "{print \\$1}"`
if [ $cal != 207c55670e306a3a06ea87456e0859da ]
then
echo Mismatch
break
fi
sleep $(( ($RANDOM % 20 ) + 1 ))
done
}
{
while true
do
find bin/ etc/ lib/ sbin/ selinux/ system/ usr/ -type f -exec md5sum \{\} \; > $name
cal=`md5sum $name | awk -e "{print \\$1}"`
if [ $cal != 207c55670e306a3a06ea87456e0859da ]
then
echo Mismatch
break
fi
sleep $(( ($RANDOM % 20 ) + 1 ))
done
}
Flush cache
nocache()
{
while true
do
sync
echo 3 > /proc/sys/vm/drop_caches
sleep $(( ($RANDOM % 20 ) + 1 ))
done
}
{
while true
do
sync
echo 3 > /proc/sys/vm/drop_caches
sleep $(( ($RANDOM % 20 ) + 1 ))
done
}
Friday, July 18, 2014
Turn Off All CPUs except the 0
for i in `busybox seq 1 9`

do

    if [ -e /sys/devices/system/cpu/cpu${i}/online ]

    then

        echo 0 〉 /sys/devices/system/cpu/cpu${i}/online

    fi

done
Thursday, December 12, 2013
Set the DD-WRT based D-Link DIR-300 ver. B as a Repeater Bridge
Original link here: http://jgiam.com/2012/07/06/setting-up-a-repeater-bridge-with-dd-wrt-and-d-link-dir-600/wp-admin/install.php
Here are the steps I did (adapted from the DD-WRT Wiki). My primary router is configured with WPA2 AES. The secondary router is running DD-WRT build 14311. The latest build in the DD-WRT router database, build 14896, is buggy.
Here are the steps I did (adapted from the DD-WRT Wiki). My primary router is configured with WPA2 AES. The secondary router is running DD-WRT build 14311. The latest build in the DD-WRT router database, build 14896, is buggy.
- Restore Factory Defaults on Secondary (DD-WRT) Router
- Connect your computer to the secondary router via wired LAN port.
- Open the address http://192.168.1.1 in your web browser. Newer versions of DD-WRT will require you to set a password before you can continue.
- Open the Wireless -> Basic Settings tab
- Physical Interface Section
- Wireless Mode : Repeater Bridge
- Wireless Network Mode : Must Match Primary Router
- Wireless Network Name(SSID) : Must Match Primary Router exactly including exact case- Make sure you spell this correctly
- Wireless Channel : Must Match Primary Router (This will disappear once you put it in RB mode, and isn’t needed)
- Wireless SSID Broadcast : Enable
- Network Configuration : Bridged
- Save
- Physical Interface Section
- Open the Wireless -> Wireless Security tab
- Physical Interface Section
- Security Mode : Must Match Primary Router and DD-wrt only works reliably with WEP or WPA2-AES
- WPA Algorithms : Must Match Primary Router
- WPA Shared Key : Must Match Primary Router
- Key Renewal Interval (in seconds) : Leave default
- Save
- Physical Interface Section
- Open the Setup -> Basic Setup tab
- Connection Type will be: Disabled
- Set STP for Disabled (Enabled sometimes can cause connection problems) redhawk
- IP Address : 192.168.1.2 (Assuming Primary Router IP is 192.168.1.1)
- Mask : 255.255.255.0
- Gateway: 192.168.1.1 (again assuming Primary Router IP is 192.168.1.1)
- DHCP Server: Disable
- Local DNS: 192.168.1.1 (if IP of Primary Router is 192.168.1.1)
- Assign WAN Port to Switch : Optionally enable this to use the WAN port as another LAN port.
- Save
- Open Setup -> Advanced Routing tab
- Set Operating mode to “Router”
- Save
- Open Services
- Disable Dnsmasq
- Save
- Open the Security -> Firewall tab
- Uncheck all boxes…except Filter Multicast
- Disable SPI firewall
- APPLY Settings
- Reboot the router.
Sunday, September 29, 2013
Build emacs 24.3 from source for Ubuntu 12.04
sudo apt-get install build-essential libxpm-dev libgif-dev libtiff4-dev libjpeg-dev libgtk-3-dev xaw3dg-dev libdbus-glib-1-dev libgpmg1-dev libgnome2-dev libotf-dev libncurses5-dev libm17n-dev
tar axf emacs-24.3.tar.xz
mkdir bld
cd bld
../emacs-24.3/configure --prefix=/home/sun409/tools --without-x --without-sound --without-pop
make
make install
tar axf emacs-24.3.tar.xz
mkdir bld
cd bld
../emacs-24.3/configure --prefix=/home/sun409/tools --without-x --without-sound --without-pop
make
make install
Saturday, July 20, 2013
Terminal emulator settings
Color
Blue: 0, 40, 255
Light blue: 0, 128, 255
Max column: 220
Scroll to bottom only when key pressed.
Terminal
Xterm
ANSI color
Scroll back 32000
Terminal type: xterm-256color
Back space sends delete
Emacs
ALT
Escape
Log
File name: %S-%Y%M%D-%h.log
Custom keys
S-PageUp: \033[1;2I
S-PageDown: \033[1;2G
S-Home: \033[1;2H
S-End: \033[1;2F
S-Up: \033[1;2A
S-Down: \033[1;2B
S-Right: \033[1;2C
S-Left: \033[1;2D
A-g: \033g
A-S-Up: \033[1;6A
A-S-Down: \033[1;6B
A-S-Right: \033[1;6C
A-S-Left: \033[1;6D
Blue: 0, 40, 255
Light blue: 0, 128, 255
Max column: 220
Scroll to bottom only when key pressed.
Terminal
Xterm
ANSI color
Scroll back 32000
Terminal type: xterm-256color
Back space sends delete
Emacs
ALT
Escape
Log
File name: %S-%Y%M%D-%h.log
Custom keys
S-PageUp: \033[1;2I
S-PageDown: \033[1;2G
S-Home: \033[1;2H
S-End: \033[1;2F
S-Up: \033[1;2A
S-Down: \033[1;2B
S-Right: \033[1;2C
S-Left: \033[1;2D
A-S-Up: \033[1;6A
A-S-Down: \033[1;6B
A-S-Right: \033[1;6C
A-S-Left: \033[1;6D
Friday, January 11, 2013
Linux kernel bigphysarea
最近在看怎麼在 Linux kernel 裡管理大塊的連續記憶體,查到這個:
http://lkml.indiana.edu/hypermail/linux/kernel/0503.2/0405.html
“We don't tend to change code for out-of-tree users, either.”
對呀,所有的這類的需求都是為了自家的 driver,你不放進 kernel 人家自然就不想支援。
附上找到的最近的 bigphysarea patch:
http://www.feise.com/~jfeise/Downloads/zr36120/
http://lkml.indiana.edu/hypermail/linux/kernel/0503.2/0405.html
“We don't tend to change code for out-of-tree users, either.”
對呀,所有的這類的需求都是為了自家的 driver,你不放進 kernel 人家自然就不想支援。
附上找到的最近的 bigphysarea patch:
http://www.feise.com/~jfeise/Downloads/zr36120/
Thursday, December 27, 2012
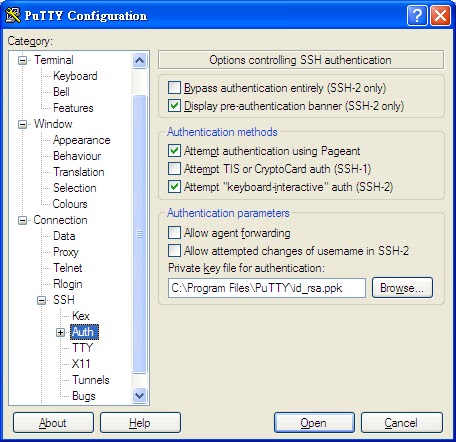
CentOS ssh login without input password by using PuTTY
1. Use puttygen.exe to generate the public key and private key. Click the "Generate" button.

2. Move your mouse to add randomness.
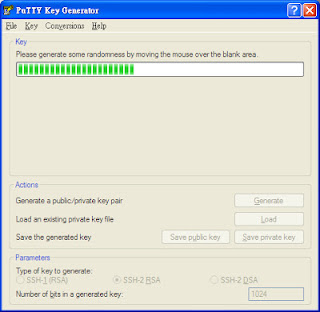
3. [IMPORTANT] Copy the selected text and append it to the file .ssh/authorized_keys on the Linux server.

4. Click the "Save private key" button to save your private key. I save it to the directory where PuTTY is installed and named it id_rsa.ppk

5. Use the just created private key.

6. You still have to log in with your password the last time. Set SELinux file security contexts.
sudo restorecon -R -v /home/$ACCOUNT/.ssh
7. Happy SSH!

2. Move your mouse to add randomness.

3. [IMPORTANT] Copy the selected text and append it to the file .ssh/authorized_keys on the Linux server.

4. Click the "Save private key" button to save your private key. I save it to the directory where PuTTY is installed and named it id_rsa.ppk

5. Use the just created private key.
6. You still have to log in with your password the last time. Set SELinux file security contexts.
sudo restorecon -R -v /home/$ACCOUNT/.ssh
7. Happy SSH!
Tuesday, December 25, 2012
Enlarge a file system in an LVM
Suppose /dev/sdb is the newly added disc. The original volume group is vg_dvd01. The logical volume to be enlarged is lv_home.
# Use fdisk to change a partition to be added to ID 8e
fdisk /dev/sdb
# Make /dev/sdb1 a physical volume
pvcreate /dev/sdb1
# Add /dev/sdb1 to the volume group
vgextend -v vg_dvd01 /dev/sdb1
# Resize the target logical volume to use 100% free space of the volume group
lvresize -l +100%FREE /dev/vg_dvd01/lv_home
# Umount the file system first to speed up the resize operation
umount /home
# Do the resize
resize2fs /dev/vg_dvd01/lv_home
# Mount it back
mount /home
Create a few users on the just installed Linux
# Create the group first with group ID 1000
groupadd -g 1000 dvdgrp1
# Create the first user with user ID 1000
useradd -u 1000 -g dvdgrp1 user1
# Add other users
for i in user2 user3 user4 user5 user6 user7 user8 user9 user10
do
useradd -g dvdgrp1 $i
done
# Set initial password to the same as user name
for i in user1 user2 user3 user4 user5 user6 user7 user8 user9 user10
do
echo $i | passwd --stdin $i
done
Enable Samba server in CentOS 6.3
- Install Samba
yum install samba samba-common - Edit Samba config file
vi /etc/samba/smb.conf - In the [global] section
security = user
passdb backend = tdbsam
# Set to follow symbolic links
follow symlinks = yes
wide links = yes
unix extensions = no - In the [homes] section
comment = Home Directories
browseable = no
writable = yes
valid users = %S
create mask = 0664
directory mask = 0775 - Enable Samba in run levels 2, 3, 4, 5
chkconfig --levels 2345 smb on - Start the just installed Samba
/etc/init.d/smb start - Add users with default password as user name
for i in user1 user2 user3 user4 user5
do
echo -e $i\\n$i | smbpasswd -a -s $i
done - Add these lines to /etc/sysconfig/iptables
-A INPUT -m state --state NEW -m udp -p udp --dport 137 -j ACCEPT
-A INPUT -m state --state NEW -m udp -p udp --dport 138 -j ACCEPT
-A INPUT -m state --state NEW -m tcp -p tcp --dport 139 -j ACCEPT - Restart iptables
service iptables restart - Let SELinux enable Samba home dirs
setsebool -P samba_enable_home_dirs on
Monday, April 30, 2012
在 Ubuntu 的命令列燒 CD
在這裡看來的
https://help.ubuntu.com/
# Create ISO image
https://help.ubuntu.com/
# Create ISO image
genisoimage -r -J -o /tmp/cd_image.iso MP3_DIRECTORY/
# List devices
# List devices
wodim --devices
# Blank the CD-RW first @ 4x speed
wodim -vv dev=/dev/scd0 blank=fast speed=4
# Burn the image
wodim dev=/dev/scd0 -v -data /tmp/cd_image.iso speed=4
Wednesday, September 07, 2011
Build Emacs 23 on Ubuntu 6.06 LTS
1. Packages to be installed before build Emacs
sudo aptitude install build-essential libxpm-dev libungif4-dev libtiff4-dev libjpeg-dev libgtk2.0-dev xaw3dg-dev libdbus-glib-1-dev libgpmg1-dev libgnome-dev libotf-dev
2. Configure and make Emacs
tar axf emacs-23.3.tar.bz2
mkdir bld
cd bld
../emacs-23.3/configure --without-pop --with-x-toolkit
make
3. The result (click to see the rendering of TrueType font)
 4. If only console mode Emacs is needed, configure and make Emacs as
tar axf emacs-23.3.tar.bz2
mkdir bld
cd bld
../emacs-23.3/configure --without-x
make
sudo aptitude install build-essential libxpm-dev libungif4-dev libtiff4-dev libjpeg-dev libgtk2.0-dev xaw3dg-dev libdbus-glib-1-dev libgpmg1-dev libgnome-dev libotf-dev
2. Configure and make Emacs
tar axf emacs-23.3.tar.bz2
mkdir bld
cd bld
../emacs-23.3/configure --without-pop --with-x-toolkit
make
3. The result (click to see the rendering of TrueType font)
tar axf emacs-23.3.tar.bz2
mkdir bld
cd bld
../emacs-23.3/configure --without-x
make
Friday, April 01, 2011
免安裝 dos2unix 就可以達到一樣的效果
cat orig_file | col -b > new_file
tr -d "\015" < orig_file > new_file
你說那 unix2dos 呢?
對不起,沒有這種需要。
tr -d "\015" < orig_file > new_file
你說那 unix2dos 呢?
對不起,沒有這種需要。
Install telnetd
如果只是為了要開發用,在 virtual machine 上裝 SSH server 實在是有點浪費 CPU,因為中間的連線都是在本機上,卻還要做不必要的 encryption/decryption。
可以只裝 telnetd 就好了,像這樣:
然後就可以 telnet 進去了,心裡上會快一點。
可以只裝 telnetd 就好了,像這樣:
sudo apt-get install telnetd
sudo /etc/init.d/openbsd-inetd start
然後就可以 telnet 進去了,心裡上會快一點。
Subscribe to:
Posts (Atom)